


The cooling impact on your graphics card is improved by changing the thermal paste on your graphics processing unit (GPU). Indeed, it also controls the temperature range at which your Graphic Processing Unit functions. The primary reason is that the factory cooling fluid included with your original graphics card is sometimes unreliable.
You may notice a rise in working temperature with time, even if it continues to do its function for a while. In our article, How to Replace Thermal Paste on a GPU, you’ll learn why it’s relevant to replace the paste, how to help cool your system, and how often can you change the paste without voiding its warranty.
What You Should Know about Changing a GPU’s Thermal Paste
Generally speaking, changing your GPU’s thermal paste should only be done when you observe higher GPU temperatures and decreased functionality.
Otherwise, if the heatsink is fixed well and you are using exceptional-quality thermal paste, it should last many years before needing to be replaced.
Although you can swap out your GPU’s thermal paste as you wish, doing so every year will only put your heatsink in danger of being harmed. It is recommended to swap out the paste if the device is acting differently than you expected or isn’t cooling down properly.
You don’t need to replace it for the duration of the device’s life if you use it for general, everyday use. However, if you use your computer heavily, you might need to change the coolant after around 15-25 years. (This can be a much shorter period if you use the PC for serious gaming at high temperatures).
Try to avoid doing it permanently if you don’t have any temperature problems.
Additionally, because new heat shock transcription factors (HSFs) often arrive pre-applied from the manufacturer, you don’t need to change the coolant if you place another heatsink on a CPU. However, if you’re fitting an aftermarket thermal system, you should replace it.
What Thermal Paste Should One Use on A GPU?

Not sure about what to use when changing your GPU’s thermal paste? Don’t fret. Here is what you need to know on how to replace the thermal paste on your GPU. Read to the end to learn also how often experts recommend changing thermal paste on GPU.
It’s still debatable if the thermal mix you employ makes a difference. Make sure the compound you choose is of the highest caliber as various thermal coolants have varied costs, cooling efficacy, compositions, and viscosities. Additionally, your choice of cooling compound is influenced by the degree of cooling efficiency you want to accomplish.
This means a wider variety to pick from compared to taking your thermal paste to a shop and requesting experts to apply it for you if you decide to apply it yourself.
Thermal pastes come in two types. The first type entails the pastes that conduct electricity. Metal elements with small silver particles conduct electricity more effectively and are often included in pastes that conduct electricity.
Due to their electrical conductivity, these pastes may readily harm computer parts if they leak in the incorrect places.
For beginners who want to replace the thermal paste on their own, pastes that feature ceramic and carbon are remarkably advised since they are harmless and cannot conduct electricity.
Despite being less efficient, this doesn’t impair the performance of your PC except if you are working it in a hot environment or with a powerful PC.
Equally, look at your computer’s build to identify the paste kind to apply. I advise using a non-conductive carbon-based TIM if it has closer workings like many laptops have you can, depending on one’s purpose abilities.
Suppose you haven’t replaced your less effective air-cooling fan and a stronger stock cooling unit. In that case, that is another factor to consider before choosing a higher-efficiency paste instead of a regularly functioning one.
Unless you wish to overclock the device’s settings to maximize performance for tasks like gaming, there is no need to go through the bother and danger of adding metal TIM if your device has a reliable liquid-cooled heatsink.
Related: Does Overclocking Reduce GPU Lifespan
Why Should You Change Cooling Paste on a GPU?
When you suspect a problem linked to the thermal unit but the waning fans usually function, changing the thermal paste on a GPU is crucial.
The coolant between the GPU and the heatsink should be changed. In this case, older GPUs need this change more than new ones.
Most thermal coolants can become hard as time progresses. In turn, your GPU may end up overheating and potentially suffer irreparable damage. Because of this, you want to swap the factory-supplied coolant paste with a superior one.
It’s also good to change a coolant on the GPU, particularly over the long term. The plates (metallic) include tiny flaws that reduce effective heat transmission and may startle you.
Reapplying the GPU thermal paste will assist in filling any existing air gaps since the defects prevent the two surfaces from making complete contact, improving heat transmission.
Thermal paste, to put it simply, makes it possible for the heatsink to do its function of assisting in GPU cooling. Therefore, possible performance concerns like throttling and other problems are reduced the cooler the GPU is.
It should be able to serve you for many years before you need to replace it, provided you restored the heatsink in the proper location, utilized high-quality thermal paste, and applied the TIM according to the proper application process.
In reality, the update will likely outlast the CPU or GPU before you notice any potential decline in performance.
Regardless of the brand you choose, you don’t need to change the thermal paste every year. Without any reason, you run the danger of breaking the heatsink connections.
In most cases, disassembling the GPU is unnecessary since doing so would violate the warranty on particular models. So save your thermal paste in a secure place for later use. Since it doesn’t expire, you may use it for the next two to three years unless it suffers extreme heat.
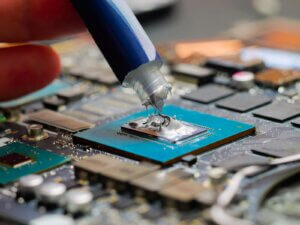
How to change the thermal paste on a GPU
After extended use, it is strongly encouraged to replace the coolant between the graphics processing unit and your heat sink. Otherwise, your GPU may begin to overheat, which is quite dangerous and may result in permanent damage.
Applying good thermal coolant will increase cooling while relieving you of having to change the paste regularly. Utilize Arctic Thermal coolant, as per our advice.
It would be best to use caution while modifying the cooling paste since it is a complex process. A thorough tutorial is below to help you with this challenging endeavor.
- Take the GPU apart
You should remove the screws holding your board, keep them together, and carefully remove the electrical wires from your graphics card. It is a good idea to keep in mind the location of all screws as you go.
Unplug the fan wire now that the GPU cover has been removed. The earlier-applied thermal paste has solidified, which may make it difficult to remove the heatsink.
When you’re finished, clean the heatsink of any gathered dirt.
- Remove your old thermal paste
Before using the fresh thermal paste, thoroughly clean the older, hardened paste. Many choose to get rid of the cooling paste with 90 percent isopropyl alcohol since it is highly effective.
With a lint-free material, use a thermal removal solvent, and clean it until all traces of the previous thermal paste are gone. This may take some time. Avoid using excessive force as this might harm the chip.
- Apply the new thermal paste
Once you have thoroughly cleaned it, apply a small amount of thermal paste. The GPU chip is to be covered when your heatsink is back in place.
The paste will spread once your heatsink is positioned over it. Bubbles will impair the cooling performance, but they should not develop if done correctly.
The paste may leak out if applied heavily, giving the surface a dirty appearance. Additionally, don’t use too little thermal paste because it would not cover the area effectively.
- Reassemble the GPU
Once the new thermal paste is applied, reattach the GPU’s heatsink, then connect the fan wire. When mounting screws, be careful to put them back in the right places.
Attach the GPU again onto your motherboard. Be careful not to overtighten the screws.
- Enjoy a Cool GPU
Congrats! You’ve finished. There should no longer be a concern with the graphics processing unit overheating.
Your GPUs performance should also improve.
How Often Should I Replace Thermal Paste On a GPU?

There are a few circumstances when changing the thermal paste on your GPU makes sense.
The first is anytime the heatsink is removed from the chip. When you take it out, you’ll see that part of the compound is still on the heatsink, and the rest is on the chip.
The same thermal paste will create air pockets when the heatsink is repositioned on the chip. Air pockets significantly impact thermal performance because they behave as insulators rather than heat conductors.
This is why you should always clean the heatsink and the chip after removing it (alcohol wipes work well in this situation) and then reapply the thermal compound. If the compound were to mix with the new one, you would reduce its performance, so make sure you remove it.
Alternatively, change the compound every two to three years if you see a decrease in cooling performance.
Remember that not all thermal compounds retain effectiveness in the same manner. While higher-end compounds may last up to seven years, cheaper alternatives are only good for two to three years.
Preserving thermal paste
Here are some suggestions if you must preserve some excess thermal paste.
Clean the syringe’s tip after each use, then screw the plastic cap back on. To stop it from drying out too rapidly, tightly secure the cap so that no air may enter.
Use a Ziploc bag that you can zip tight if you cannot replace the cap or have misplaced it. Before sealing the Ziploc Bag, remove the majority of the air.
Never pull back the syringe plunger. You will significantly shorten the compound’s shelf life since it will let air into the syringe, which causes oxidation.
After closing the syringe, place it at room temperature or a little colder. Avoid keeping the compound in areas that often experience extremes of heat or cold, such as a basement or attic. You must also keep it away from direct sunlight.
Conclusion
In conclusion, it is necessary to replace the thermal paste on a GPU if you want to ensure that your GPU is running efficiently and reliably. It is important to use the correct type of thermal paste for the job, as some types of thermal paste can be harmful to your GPU.
Additionally, it is generally recommended to replace the thermal paste every 2-3 years, as it can become less effective over time. Be sure to read the instructions carefully and take all necessary precautions when replacing the thermal paste on your GPU.
Related Content:
Can You Put A CPU Cooler On A GPU?
Best Graphics Cards For Gaming [2022]
Does A Motherboard Matter For Gaming?
FAQs On Changing Thermal Paste on A GPU
Can You Put New Thermal Paste Over Old?
The device is harmed by putting fresh paste on top of the old, although doing so decreases the inefficiency of the paste since more layers impact heat conductivity.
Clean the old paste off the GPU using a microfiber cloth bathed in isopropyl paste to guarantee efficient heat conduction.
Even though liquid-metal and other higher-quality thermal paste variants have more vital conductivity, customers often have trouble applying and cleaning it.
Additionally, because most coolers already have a thermal paste, you don’t need to add another layer. Instead, utilize it as it is right away, even if you think it is low quality.
How much thermal paste should I apply?
Since mounting pressure will force the additional paste to squirt out while tightening the cooler, applying too much thermal paste to a socket won’t seriously affect your PC’s thermal performance.
Applying inadequate paste will still have the same impact after the cooler is tightened, so try to avoid doing so at all times.
Remember that thermals are not the issue when using excessive thermal paste. Instead, there is a chance of shorting the computer parts, mainly if the conductive metal is included in the compound.
You’ll create a big mess if you don’t use non-conductive paste.
In addition, contrary to what is often believed, rigorous testing and research have shown that using too much paste will not raise your body temperature. But it will happen if you use too little paste.
How long does thermal paste last when stored?
The shelf life of a tube of a thermal compound that you purchase depends on the compound’s kind and the storage environment in which you keep it.
If the paste is kept cold, out of direct sunlight, and with the cap on correctly, Cooler Master, for instance, recommends a two-year shelf life.
A faulty thermal compound will either be flaky, complex or entirely dried up; in other words. It will be easy to see.
You need a new thermal compound if this is the situation. The compound will start to show indications of drying out after two to three years, even though some producers give it a shelf life of four to five years.
How to Change Thermal Paste on A GPU And Not Void the Warranty?
If you don’t physically meddle with the GPU when replacing the thermal paste, your warranty will remain in effect. You shouldn’t have any difficulties while changing your TIM; be careful not to harm the PCB and to leave the warranty label in place. Please use care while applying the die’s thermal paste to ensure it is adequately covered.
Incomplete or partial dye coverage may result in shutdowns and screen blackouts because specific GPU components will overheat. When spreading the GPU, utilizing a star or x pattern rather than a dot is advisable since the latter is more likely to produce air bubbles, which might lead to the GPU overheating even if reports claim otherwise.
The likelihood of your warranty being voided increases in such circumstances. Additionally, even though specific computer models say that you may invalidate the guarantee by removing the label from the screw heads, this is not in compliance with the requirements of the American Warranty. Check what you may and cannot do by carefully reading your warranty.
